EASY
STEP-BY-STEP
INSTALLATION
|
|
|
IMPORTANT
- The following instructions were
provided by Bike Rite, the manufacturer
of the Ready Rider®
and
are listed here as a courtesy. For the
latest details, please refer to your Ready
Rider®
user
manual or contact Bike Rite.
The Ready
Rider®
should
be installed and used strictly by an adult.
Please refer to drawing for part identification.
Part numbers in ( ) in Step 1.
|
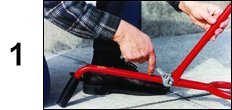
STEP 1
Insert Handle Grip (1) onto Rider Handle
(2) and then insert the Rider Handle into
the Rear Fork (3) (be sure to line up holes).
Align holes in Stabilizer Bar (4) and Rear
Fork, then insert Carriage Bolt (5) through
both. Partially tighten Lock Nut (6)
(see photo 1). |
|
|
|
|
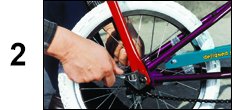
STEP 2
Loosen nuts on rear wheel axle.
Place Rear Fork slots onto axle securely,
then partially tighten axle nuts (see photo
2). Insure wheel is centered in the
bike frame and not rubbing on either side
of frame. |
|
|
|
|
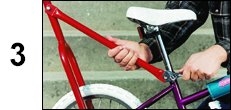
STEP 3
Remove seatpost clamp nut and place
Stabilizer Bar onto bolt and retighten nut
securely to 100 inch/lbs (see photo 3).
Then tighten carriage bolt on Ready Rider
assembly to 180 inch/lbs and read wheel
axle nuts to 240-300 inch/lbs. |
|
PLEASE NOTE!
The Ready Rider®
can also be used along with training wheels
(balancers). Just loosen the rear
wheel axle nuts and place the Rear Fork
slots on the axle outside of the training
wheel support struts. Then tighten
rear axle nuts to manufacturer's specs (240-300
inch/lbs.). |
